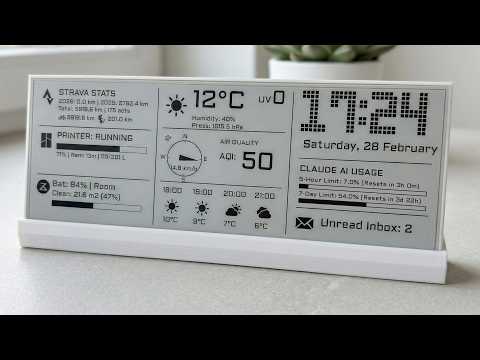
A fully functional E-ink dashboard running on a Raspberry Pi Zero 1W or 2W. Designed for large Waveshare e-Paper displays (e.g., 10.85"), this project aggregates essential daily information and smart home status into a clean, minimalist interface.
- (NEW!) Now supporting both Raspberry Pi Zero 1 & 2!
- (NEW!) Codex usage data: Displays usage data for Codex, showing the limit, and limit reset time.
- Antigravity usage data: Displays usage data for Antigravity, showing the limit, and limit reset time.
- Claude Code usage data: Displays usage data for Claude Code, showing the daily limit, weekly limit, and limit reset time.
- Weather & Air Quality: Real-time temperature, humidity, wind direction/speed, UV index, 4-hour forecast, and AQI (with visual inversion for high pollution levels) using the Open-Meteo API.
- Strava Integration: Displays total and yearly activity statistics (distance and ride counts), including specific breakdowns for biking and hiking.
- Bambu Lab 3D Printer: Live monitoring of print status, completion percentage, remaining time, and current layer progress.
- Roborock Vacuum: Live battery level, current status, and tracking for cleaned area during active cleaning.
- Spotify: Displays the currently playing track and artist.
- Gmail: Tracks the number of unread emails in your primary inbox.
- System Fallbacks: Automatically switches to displaying System Load (CPU/RAM usage) or Cryptocurrency prices (BTC/ETH) if certain hardware integrations are disabled or offline for demonstration of dashboard capabilities. The fallback wedgets are not required tokens and ready to go.
- Optimized Rendering: Uses partial screen refreshes to prevent flickering, with scheduled full refreshes to clear e-ink ghosting.


Enable the SPI interface on your Raspberry Pi, which is required for communicating with the e-ink display:
sudo raspi-configGo to Interfacing Options -> SPI -> Enable.
Update your system and install necessary system-level dependencies, including tmux for keeping the script running in the background:
sudo apt update
sudo apt install python3-pip python3-pil python3-numpy git tmux -yInstall the required standard Python packages:
pip3 install requests Pillow google-api-python-client google-auth-httplib2 google-auth-oauthlib aiomqtt python-roborock paho-mqtt gpiozero lgpio spidevNotes:
The bambulabs_api library is already bundled in this package (in lib/), but its dependency paho-mqtt is not — it is included in the command above.
On Raspberry Pi OS (Bookworm) the GPIO/SPI packages are best installed via apt (a system-managed Python may reject pip for these). If pip3 complains about an "externally-managed-environment", install them with:
sudo apt install -y python3-gpiozero python3-lgpio python3-spidev-
The patched version of the epd10in85 library with fixed partial refresh issue already included in this package.
-
(New) Included support of Raspberry PI Zero 1.
All widget toggles and API configurations are located at the top of the main.py script. You can enable or disable specific widgets using the ENABLE_* boolean variables.
- Codex limits are read from the official OpenAI Codex CLI tokens — unlike Claude, the dashboard does not run its own browser login flow.
- Install the Codex CLI (for example
npm install -g @openai/codex) and run codex login in the terminal. - A browser window opens — sign in with your ChatGPT account and click "Authorize". (Codex usage limits require a paid ChatGPT plan that includes Codex.)
- After a successful login the CLI writes your tokens to
~/.codex/auth.json(on Windows:%USERPROFILE%\.codex\auth.json). - Copy that file into the project root, next to
codex.py, keeping the exact nameauth.json. - Set
ENABLE_CODEX = Trueinmain.pyand run the script. The dashboard readsauth.json, fetches your usage, and from then on refreshes and rotates the tokens automatically, updating auth.json in place.
- Run the
main.pyscript from the terminal for the first time. - The script will pause, ask for your to copy the authorization URL and paste it on real browser.
- Open that URL in your browser, click "Authorize", and you will be redirected to a dead
localhostpage. - Copy the whole URL containing
code=...portion from your browser's address bar and paste it back into the terminal. The script will automatically fetch and save the required tokens toclaude_creds.json.
- Go to your Strava API Settings and create an API Application. Now only payed accounts supported
- Note down your Client ID and Client Secret.
- Run the
main.pyscript from the terminal for the first time. - The script will pause, ask for your ID/Secret, and print an authorization URL in the console.
- Open that URL in your browser, click "Authorize", and you will be redirected to a dead
localhostpage. - Copy the
code=...portion from your browser's address bar and paste it back into the terminal. The script will automatically fetch and save the requiredactivity:read_alltokens tostrava_token.json.
- Open
main.pyand input your Roborock account email address in theROBOROCK_CONFdictionary. - Run the script from the terminal.
- The script will request an OTP (One-Time Password) which will be sent to your email.
- Enter the 6-digit code in the terminal. The script will securely save your session data locally.
You DON'T need to enable "LAN Mode" on your Bambu Lab printer to access local data.
- On your printer's screen, go to Settings -> Network.
- Note your printer's IP Address, Serial Number, and Access Code. (Force on your router to map exact IP address)
- Update the
PRINTER_CONFdictionary in the script with these local credentials.
Since the official Spotify API requires running a local web server for complex token renewals, this dashboard uses Last.fm to fetch the current playing track reliably form Spotify. It's is transparent and working method.
- Connect your Spotify account to Last.fm.
- Create a Last.fm API account to generate an API Key.
- Update
LASTFM_CONFin the script with your API Key and Last.fm Username.
After configuration, you no longer need to use the Last.fm service, and a paid Last.fm account is not required. You can continue to use only the Spotify service.
- Go to the Google Cloud Console.
- Create a new project and enable the Gmail API.
- Create OAuth 2.0 Client ID credentials (choose "Desktop Application" as the application type).
- Download the generated JSON file, rename it exactly to
credentials.json(if your setup requires it, or just usetoken.jsongeneration), and place it in the same directory as the script. - On the first run, the script will open a browser window (or provide a link) for you to log in and grant read-only access. It will generate a
token.jsonfile for all future headless authentications.
To ensure the dashboard continues running even after you close your SSH connection, use tmux.
- Start a new tmux session:
tmux new -s dashboard- Run the script inside the tmux session:
python3 main.py- Detach from the session (leave it running in the background) by pressing:
Ctrl+B, then release and pressD.
To reattach to the session later and view the logs or stop the script:
tmux attach -t dashboardThe dashboard is built on a robust, multi-threaded architecture designed to keep the UI responsive and prevent hardware lockups.
- Asynchronous Data Fetching: Instead of fetching all data sequentially, the script spawns dedicated background threads. Each service (Weather, Strava, Roborock, Bambu Lab, etc.) pulls data asynchronously at its own specific interval. This ensures that a slow API response or a temporary network drop from one service will never block the others or freeze the system.
- Scheduled Rendering: The main application loop acts purely as a renderer. It collects the latest available information from a thread-safe global data store and pushes a new frame to the e-ink display exactly once per minute using a partial screen refresh.
Important Notes:
- Initial Data Population Delay: When you first launch the script, you will notice that the widgets may show placeholders or zeros, and the full array of data takes a few minutes to completely appear on the screen. This is an intentional design choice to stagger initial network requests. It prevents sudden spikes in CPU usage, avoids overwhelming the Raspberry Pi's network stack, and respects the rate limits of the external APIs.
- Hardware Refresh Limits: The 60-second rendering interval is strictly enforced. Refreshing the screen more frequently than once a minute is strongly discouraged by the display manufacturer (Waveshare). Aggressive refresh rates on large e-paper panels can lead to severe ghosting and may cause permanent hardware damage to the display.
You can download the case stl files here.
(Youtube clickable)